VirtualBox and trixbox. How to run trixbox as a virtual machine.
Basic Configuration and Guest Install
- Quote by the developers “innotek VirtualBox is a general-purpose full virtualizer for x86 hardware. Targeted at server, desktop and embedded use, it is now the only professional-quality virtualization solution that is also Open Source Software.”
- More details at the VirtualBox website.
The first test bed for this how-to was a 1.4GHz laptop with 512M RAM, running Win XP. This was used simply because it was a spare pc at the time. There was no point in trying out an installation of VirtualBox on an office PC that supported essential office activities.
- The exercise worked out well.
- On the laptop a single instance of trixbox ran under VB 1.5.4 with very few problems.
- More details of our results are on the testing VirtualBox page.
Introduction to VB:
- In this example the laptop OS is the Host OS (Windows, Linux or MacOS). In this case Win XP
- Centos is the Guest OS running under the control of the VirtualBox application.
- trixbox is running under Centos
- The (laptop) memory is shared between the Host and the one or more Guests that are running so the more memory the better. In this example the 512M ram was split into 256 for the XP host and 256 for the Guest. Clearly this was miserly but was adequate to prove the point and to test VirtualBox.
- Each Guest install requires storage for its file system, this is equivalent to the hard disk partitions on a ‘real’ server.
- VB offers the option of a file system that grows as required so you may choose to create an 8Gb partition for a Guest but when first installed only 1.5 Gb will be taken up. With VB these are created as files on the Host’s hard disk. Of course, you need to be sure that there is enough disk space for each Guest installed.
- For the Guest to communicate with networks outside of the Host a connection is required between the Guest and the network adapter of the Host system. In effect the Guest and Host usually share the same NIC.
- With VB there are various ways of doing this, but they may not always be foolproof and they can require changing the properties of the Host NIC. So FIRST try VB out on a non critical machine so that if you mess up the NIC configuration your don’t lose the use of the Host until you sort out the problem.
- This how-to just scratches the surface of the capabilities of VB. There is an extensive user manual ~ 168 pages on their download page.
- VB can run on Windows, Linux and MacOS hosts details on the download page.
- VB reliably supports Linux and Windows Guests. See the community forum for info on work on other guest OS’s
- VB provides hardware support for Network Interfaces, Serial Ports and USB devices. So your Guest can access these on the Host. So no PCI bus devices.
- If you click when your mouse pointer is over a running Guest window the mouse and keyboard input then ‘captured’ by the Guest application that is running. The user input then goes to the Guest. In order for the user input to escape and apply to the Host, there is a ‘hot-key’. By default this is the righthand ‘control’ (Ctrl) key and, this reverts the input back to the host.
- Click on an image below to Zoom
Installing VB on a Windows host
- Download the VB windows installer file
- Currently this is VirtualBox_1.5.4_Win_x86.msi
- Run the installer
- Run the VB Application
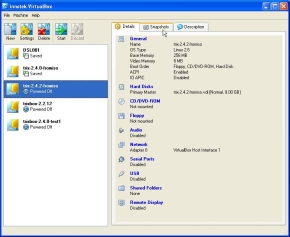
- Have a look around at the application and the options.
- If you select a particular Guest that is “Powered Down” you can then change its settings.
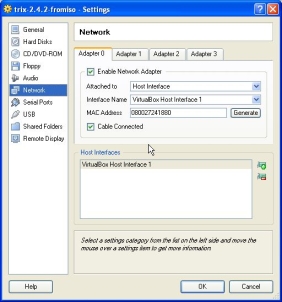
Networking for the Guest. “VirtualBox Host Interface” (VHI)
- Select the “Settings” option for the Guest
- You can only do this for a Guest that is “powered down”
- Select “network”
- Then in the “Host Interfaces”
- Click the little add button (green plus) to the right to add a VHI
- You need to do this FIRST.
- When you create your Guest you can then define how the VHI connects to your Host NIC.
- Main options are “NAT” and “Host Interface”.
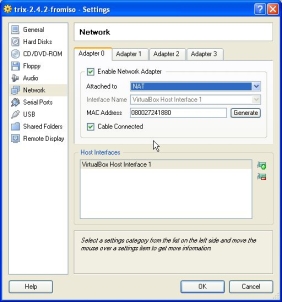
NAT
- NAT makes the VB application act like a Nat’d router.
- The Guest will end up with an IP like 10.0.2.15.
- IP provided by the VB DHCP server.
- Your Host will be on 192.168.1.100 or equivalent.
- Remotely communicating with your Guest is going to require port forwarding.
- Not fun if you are running VoIP and SIP phones, but it can be done, of course.
- The VB manual describes how you set up port forwarding.
- It’s not clear to us how you set up a range of ports to forward.
Host Interface Option
- The ‘easiest’ network configuration for VoIP is to select “Host Interface”.
- This puts you Host and Guest systems on the same subnet.
- This option requires that on your Host system you create a ‘Bridge’ between your HOST NIC and your VB VHI.
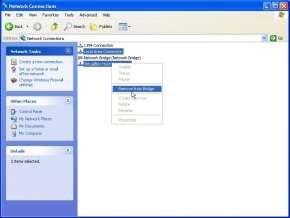
Create a Network Bridge
You do this in your XP “Network Connections”. This creates a Network Bridge between your Host NIC and the VHI and means that your Guest can have an IP on the same subnet as your Host.
- Host 192.168.1.100
- Guest 192.168.1.50
- For Much better for VoIP.
- The image here shows the Win XP network connections after the “Bridge” has been setup. Here the option is to remove it.
- Select the two connections that you want to bridge
- Right Click and select “create bridge”
Network Bridging and Win 2K
The instructions above only work on WinXP. Win2K does not have a bridging option. However, you can download a bridging utility from here. It is simple to install and bridges the the Virtual Box VHI NIC with the real RJ45 NIC on the test Dell Inspiron. Bridging does not seem to function when the bridge is created between the VHI and a wifi network connection.
Guest DHCP
- The VirtualBox application has a built in DHCP server so all Guests will be allocated an IP.
- Once you are logged in you can change the IP and if you are try various versions of trixbox it may be convenient to give all the Guests the same IP (assuming that you are only running one at a time) so that each one can access the same phones and trunks for test purposes.
Run the VirtualBox application
- Define your first Guest, select the “New” icon and follow the setup wizard.
- A good OS to start out with as a Guest is DSL Damn Small Linux
- The DSL download is only 49M.
- It’s a quick download and quick install.
- It’s a Live CD so you always boot from the CD or the ISO image
- A good way to get used to VirtualBox
Guest Setup
- Give the VM a name
- Select the OS type (not critical just helps the wizard)
- Specify memory - accept default
- Virtual Hard Disk - select “New”
- Disk Image Type - select expanding
- Disk location and size - default values
- Check the summary
- Virtual Hard Disk - accept default
- Click Finish
- Your new Guest VM will appear in the list possible Guests.
- Select the Guest and click “Start”
- Use the First Run Wizard
- Select Installation Media
- Choose CD/DVD device and Media Source
- Suppose you choose “Image file”
- Browse to find the correct image, use the Add button etc.
- > Next > Check the Summary > Finish
- The installation will start - just as though you had a CDRom in a real drive on a real machine.
Boot options
- If you reboot your VM you need to check what boot source is used.
- If you installed from CD and removed it from the Drive, there is no problem
- Installation from ISO image requires that post installation you change the Boot order.
- So that on reboot you don’t go through the installation again.
- Select the Guest > Settings > General > Advanced
- Change the boot order, just as though you were in a normal PC Bios.
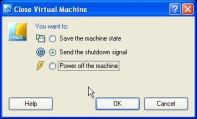
Shutting the Guest OS Down
- To close down a Guest, Select “machine” on the toolbar and then either
- Save the State - i.e store the current state as a disk file on the host so that you can restart from where you left off
- Send the shutdown signal = Shutdown -h now
- Pull the plug!
- Note
- With some Guests the shutdown using the option “Machine” in the toolbar seems not to work.
- Shutdown the Guest VM through its own window using “Shutdown -h now”
- Then issue “Power Down”